
Silk Painting 101
- Carrie Wright
- May 18, 2018
- 6 min read
Updated: Sep 1, 2022


NEW 2022 RELEASE: SILK PAINTING 101 ONLINE COURSE! Click here to learn more!
There are some basic facts to know about silk painting. Some of them, because I am 100% self-taught, I learned the hard way. Let's start where I did: by learning about the lingo while learning about the tools and products of the trade.
Dye vs. Paint
When I began my research years ago, it took me quite a long while to figure out that several terms were being used interchangeably. For example, we call this silk painting, but we aren't always using paint. There is such a thing as silk paint, but that is a different product than silk dye. I use dyes, not paints, for several reasons, the most important being that dyes have pigments that chemically bond themselves to the fiber of the fabric. This leaves the feel of the fabric completely in tact. Silk paints rely on pigment suspended in a medium which sits on top of the fibers, thereby changing the feel of the fabric wherever it is applied. Everything I have read and the photos I have seen indicate that dye colors are more vibrant than paints and have more color options. I have never used paints, so I am too ignorant to comment any further. (I will explain the process of making dyes colorfast next week.)
Resist
Resist is a generic term for anything that stops pigment from reaching the silk fiber. The real work in silk painting is not necessarily in the application of the pigment, but in the technique of applying resist. Think of resist as illustration lines, but applied by squeezing a bottle with a little tip on it rather than holding a pencil. Here's a link to my YouTube channel where you can watch a series of videos of me at work applying resist and painting.
There are several types of resists: gutta, a solvent based product that leaves behind a rubbery feel on the fabric which must be dry cleaned to remove after steaming, available in clear and black and some metallics; water-soluble resist, which is almost like gutta in how it behaves and is often still called gutta, but can be removed by washing after steaming; and batik, which is hot wax and typically used with cotton, but is also preferred by some silk painters. (To see more info on my use of wax techniques, start with this post titled Hand-Painted Plaids.) All resists are allowed to dry completely before painting begins.
When I started on the large banners, I used metallic solvent-based gutta because I wanted the gold outlines in the work. Because of the volume of scarves I am painting, and because of the ease of water clean up, I exclusively use a concentrated water-based resist now. The concentrate requires the extra work of diluting it to my desired consistency, but I get to dilute with dye rather than water to make my lines any color I want. I like that control! About the consistency- too thin and the lines will spread out wider than what you might intend, too thick and the gutta will be gloopy, hard to apply and may not permeate all the fibers of silk properly. It is a delicate balance, and I don't always hit a home run.
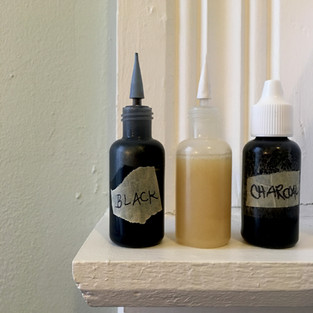
I primarily use black, clear- which leaves behind the white silk- and charcoal- because I like the look of a graphite pencil line. Keep in mind that wherever a line is applied, the line remains in the finished piece. Here are some good representations of how resist lines act as illustration lines.


Last, is a product called antifusant. It is applied with a brush on the surface of the fabric wherever I want to inhibit the flow of dye. Generally speaking, a gutta line will not allow any dye to reach the fiber where it is applied, but will not stop the dye from flowing across the fabric wherever the gutta is not. Antifusant does allow dye to reach the fabric, but keeps the dye in place right where I paint it on. I use antifusant when I don't want illustration lines showing up in my work. In designing wedding gowns and formal wear in the past, I was always picky about where seams would be allowed to show. I suppose that has crossed over into my silk painting. Sometimes, I simply do not want to see lines in the design, and antifusant is what allows me to prevent them.
Think of how a little drop of iced tea spreads on your shirt until it is soaked up by the fibers. Same thing happens with dye. Resists are all about gaining some control over where the dye is allowed to live. Some artists use a water technique in which the silk is wetted before dye is applied. Color does not spread nearly as much when applied to wet fabric. However, the lines do dry with fuzzy edges, which is not always what I'm after. Here are some photos of work done with antifusant. See if you can spot the absence of lines and why I might have wanted to use this technique for these designs.


The Silk
Any type/weave of 100% silk can be dyed/painted, and I nearly always start with pure white never-dyed silk as a base. What is most important to consider is the surface texture. Shantung has a very rough surface while satin is quite smooth. Why does that matter? The rougher the surface texture, the more jagged and irregular your strokes, lines and details. Smoother surfaces are easiest to paint. I chose a rough dupioni silk for the wedding banners because I wanted the added dimensional of the nubs and slubs in the floral elements, and also because it is traditionally a bridal gown fabric. However, the lettering was very tricky and required painstaking effort to keep crisp lines on each letter's edges! I choose soft, floaty, smooth fabrics for scarves and almost all other work.
My Process
Sometimes I know what I'm going to paint before I begin. I have a specific design in mind and play around in Photoshop in order to obtain a very detailed, specific image that I can use as a pattern. In this case, I tile print the image at home on 8.5"x11" paper, tape it all together, then lay the silk on top of the image and carefully trace with either a pencil or a disappearing ink fabric pen all while shooing Penny, my cheerleader cat, off of the silk. Those lines become my gutta lines and/or design guides. This tracing technique is how I do lettering on banners. It is the best way of ensuring the text lines are level and kerned properly. Sometimes I outline in gutta for that work, but often apply antifusant instead so that I can carefully brush each letter into place without an outline.
Other times, I free paint, sometimes on silk that is covered in antifusant and sometimes by beginning with freehand gutta lines. Some of my favorite scarves were designed in the moment of making, problem solving spaces as I go with the added pressure of knowing that I might permanently destroy the work with a bad artistic choice. I like that pressure. I enjoy designing without an undo button and find it very freeing! Below are some examples of work done on the fly with nothing more than a general flavor and some ideas in mind before suspending a blank white scarf onto the frame.


I've come to love Jacquard's Red Label silk dyes. I've tried expensive imported French silk dyes, but I truly see no discernible difference in my work. Again, I'm self-taught, so what do I know?! I can mix to any color in the rainbow from a small selection of basic concentrated colors I keep on hand- yellow, scarlet red, poppy red, magenta, kelly green, cyan, royal blue, digital, brown sienna, black. I use a scrap piece of silk in an embroidery hoop as my blotter, testing colors as I go. I have the best intentions of starting a color library, have the note cards and system all ready to go. So far I have five color formulas in it. Five. Useless! My excuses: I like mixing colors and have a good feel for how to mix to what I'm after, so having a formula library isn't much of a time saver; I mix small amounts in a watercolor palette for each piece because I don't have space for lots of little bottles of mixed colors sitting around my studio- I'm in a 10'x10' space people; let's just make it a selling point and say my designs are truly even more one of a kind even if I'm painting the same image over again.
My brushes are not worth mentioning. Using me as an example is not a good idea. I picked up brushes we had laying around the house when I first started and have never upgraded beyond my husband handing off one of his fine squirrel hair liner brushes for lettering. I am long overdo in purchasing higher quality brushes! I keep using what I have on hand and am so familiar with them that I am intimidated by the process of becoming acquainted with new ones. I need to make this a priority!
I do my best to post short videos on Facebook and Instagram (@carriewrightsilk) of my painting process so that you can see it in action. In the next post, I wrap up this three-part series by showing you what happens after a piece is finished: preparing the silk and the details of my DIY steamer, rinsing silk, and my photography setup. As always, if you have questions about anything I've shared here, just ask me! Making stuff is for everyone to enjoy!